How to get the most from the Touch Bar on a Macbook Pro
Apple has recently updated the MacBook Pro range, and when we originally reviewed the first Macbook Pro to include a Touch Bar, we focused on the benefits for a creative business. Now that all models come equipped with a Touch Bar, it feels like a good time to have an in-depth look into what can be done with the Touch Bar, and how you can set it up to suit your own needs and requirements.
In 2016, when Apple first showed the world their new ‘multi-touch, retina display strip’ that was replacing the standard multi-function ‘F’ keys, there were the inevitable reactions to the news;
- “What about the escape key?”
- “What about our function keys?”
- “What about the programmers?”
Once the initial conversation had died down and users got hands-on with the Touch Bar, they began to realise it's potential. The Touch Bar is an OLED display that adapts its functions according to the foremost app you are running. We’ll cover some of these apps in more detail later but, let’s start with a first-look for new users.
Touch ID – Fingerprint Sensor
One of the first changes you might notice when using the latest Macbook Pro with a Touch Bar, is that the power button has now been merged with the Touch ID button. It's worth highlighting the level of security Apple has incorporated here; Apple uses a separate processor to securely handle your biometric information, held in what is known as the Secure Enclave. In short, this means that your biometric data is stored in a separate, even more, secure part of the system to your primary operating system. Third-party programs can create, store and access only their own data in the enclave. They will never have direct access to information created by any other programs or the operating system. Information secured in the enclave is digitally locked away as strongly as is it can be, with current technology.
What this means for us as users, is that we can secure our login details, card payment details, passwords as well as secure files and folders by our finger-print, instead of traditional passwords (as an aside, please check your passwords don’t fall into one of the top 10 most commonly used). It’s a great addition that is both much quicker than typing (and frequently re-typing) passwords and more secure than having to write them down.
Siri
Another benefit of the new layout on all-new MacBook Pro machines is you can now quickly and easily access Siri through the Touch Bar. Located next to the Touch ID button in the top right corner, just above the hardware delete key, is the Siri symbol. It's a more discreet option than invoking your digital assistant than saying "Hey, Siri.." aloud. If you decide that you'd prefer to get Siri's attention in the usual way, via voice activation, there is the option to remove Siri from the Touch Bar.
How to Customise the Touch Bar
Which brings us neatly on to the fact that you can customise the Touch Bar to better suit your requirements, both within apps with Touch Bar support as well as the macOS ‘control strip’.
There are options that you will likely want to keep handy, such as brightness and volume control which are a very easy ‘tap to open’ and then adjust using a slider that appears on the bar. For anything that you do wish to change, if you click on your desktop background (making sure you are in 'Finder' app) and then click View in the top app bar menu, you can select Customise Touch Bar from the drop-down menu and experiment with different settings and layouts to suit your personal preferences.
Which Apps make use of the Touch Bar?
A primary function of the Touch Bar, is to help expose functionality that might otherwise be buried within a program's menus, allowing you to work faster and more efficiently. The Touch Bar is still a relatively new concept however, more developers are paying attention to its potential uses. Here are a few examples -
Safari/Chrome

The default functions are simple and efficient. Backwards, forwards, refresh, go home, URL search, favourite a page, and open a new tab. Some of these you may already know the keyboard shortcuts for but, for others, it may be faster to use the Touch Bar.
Photoshop

This is just an example of some of the Touch Bar tools available through Photoshop. As we've already shown you can customise the controls on display and they will change, depending on the context, within apps (i.e. showing a full colour-palate) which is far more useful than the older Function keys could have been.
Spotify

As with Chrome and Safari, Spotify has kept things simple in an attempt to maximise the utility of the Touch Bar for their users, and Spotify might be the app I use most with the Touch Bar. Whilst listening to music, you can see and use all the expected controls, play/pause, skip track, etc, without having to mouse around the Spotify app on screen. As you would expect, Apple's built-in iTunes application benefits from similar easy to use controls.
Pixelmator
![]()
Pixelmator is an alternative to Photoshop for image editing. You can quickly switch between tools, various options, compare the differences between edits, and even switch between image layers using the Touch Bar.
There are plenty of other apps making great use of the Touch Bar and we've highlighted some previously. No doubt now that this is a feature on all models of MacBook Pro, even more developers will be looking to make the most of the Touch Bar in their apps
Tips and Tricks for Using your Touch Bar
Remember to look down! - I appreciate this is a strange piece of advice, but many of us have become quite adept at typing without needing to look at the keyboard. Make sure to throw a glance at the Touch Bar now and again to see what it has to offer!
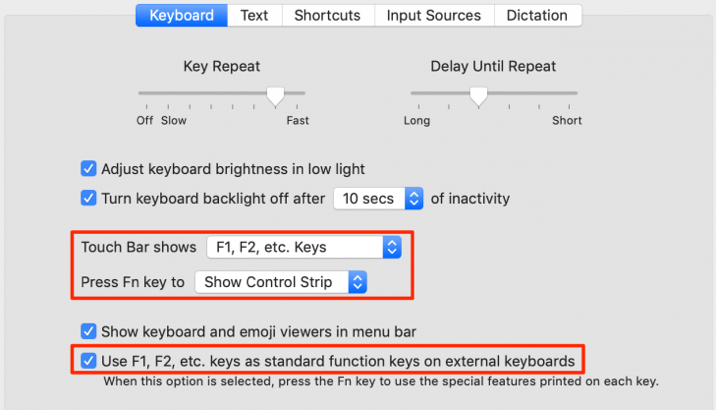
Find your Function Keys - All is not lost if you’re a regular user of the function keys in various pieces of software. If you, open up System Preferences and select the Keyboard icon, you’ll see the option to change what the Touch Bar shows by default. When 12 function keys aren't enough, it is possible to customise the Touch Bar via the Terminal app to show up to 20 function keys!

Predictive Text - If you’ve used a modern mobile phone, this will be a familiar function to you. Within various apps on your Macbook Pro, you’ll notice that as you’re typing, the Touch Bar will offer predictive text options. It can also be very useful for finding the right emoji for the occasion!
Answering Calls - When a call comes in via an app such as FaceTime, you don’t even need to break (finger) stride to accept or reject a call.
Taking a Screengrab - As some of you may know, pressing Cmd-Shift-4 will allow you to take a screengrab of the screen. The Touch Bar can help make the process a bit easier, as well as giving you more options you may not know about. For example, whether to take a grab of a specific section of your screen, a specific window, or just the whole screen.
Get hands-on and try the MacBook Pro Touch Bar for yourself at a KRCS Store or view the full range in our online store
Follow us on Twitter
Email us at info@krcs.co.uk
Give us a call on 0115 985 1797
 12 months interest free on any Mac over £1,000.
No Comments yet. be the first to comment.