
Jamf Infrastructure Manager Introduction & Setup Guide
What is Jamf Infrastructure Manager?
The Jamf Infrastructure Manager (JIM) is a tool which allows you to securely integrate an LDAP service with Jamf Pro in the cloud, without having to make your directory service visible to the internet. An LDAP integration in essential to most Jamf Pro solutions because it allows enrolment of devices to be authenticated against your organisations directory service, scoping of policy and profiles to LDAP users and groups and content of configurations to leverage information held in the LDAP (e.g. email and calendar setup). Making your LDAP service available to the internet by simply opening routes through your firewall would allow integration with Jamf Pro, but we would strongly recommend against that because of the personal information this would potentially reveal hackers which may contravene data protection and GDPR regulations. This is what a JIM looks like in your network setup where the Jamf Infrastructure Manager can be in a DMZ (demilitarised zone on your internal network), or as is shown here on the same LAN as the LDAP service:
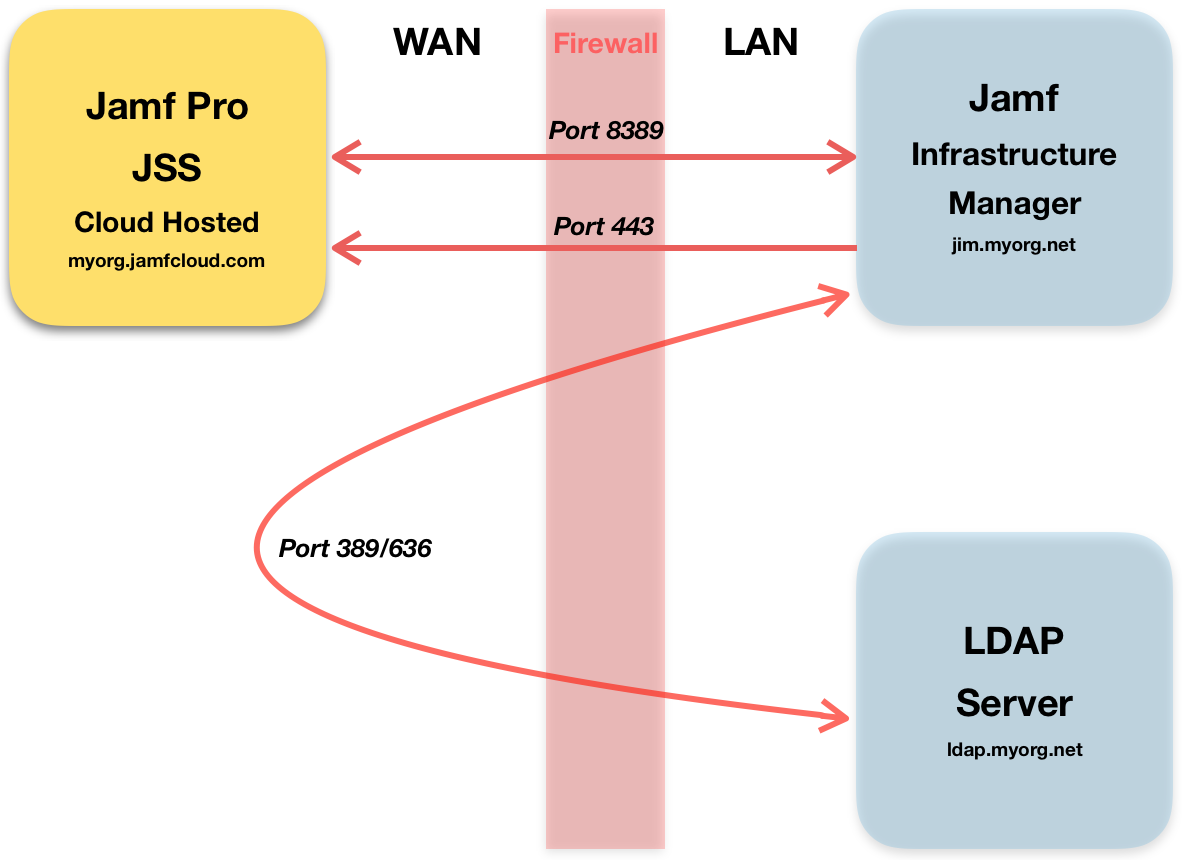
The Jamf Pro MDM requires an authenticated and secure link to your JIM on port 8389.
The JIM will check in with your Jamf Pro MDM over port 443 at regular intervals.
Your LDAP service will be queried by your JIM which then returns results to Jamf Pro on port 8389 on demand.
Setup under Ubuntu Server
The setup process for a Jamf Infrastructure Manager instance is documented here, but as with many such services there are a few pitfalls that you can fall in to which we will try and bridge in this article.
Our setup consists of:
- Mac Pro host running macOS X
- Virtualbox running host Ubuntu Server 16
- Zyxel Zywall security appliance Firewall
1. DNS
The most important thing to get right before you start deploying software is the DNS setup. If your JIM is hosted on the internet this step is not quite so essential, but when hosting the JIM behind a NAT you must setup split DNS so your JIM resolves to the LAN IP address internally and WAN IP address when queried outside of the network. e.g:
From the internet jim.myorg.net resolved to 81.23.45.72
From the LAN jim.myorg.net resolves to 10.0.10.22
It’s also essential for a LAN setup behind a NAT that DNS records are in place to resolve ldap.myorg.net to the same WAN IP address from the JIM and the JSS, which will normally result in the query from your JIM to the LDAP server going in and out of your network (which may require firewall exceptions).
2. Port Forwarding
By default the JIM will listen on port 8389 for requests from your Jamf Pro MDM so that port need to be allowed through your firewall and forwarded by NAT. This needs to be forwarded to the LAN IP address of your Ubuntu VM. In our setup we recorded a static DHCP reservation in the Zyxel router for the MAC address of our Virtualbox VM so we had a static LAN IP address of 10.0.10.22.
3. Virtualbox setup
Before installing the Ubuntu operating system you need to check that the network settings are correct for the VM.
In our case we setup a bridging mode for the Mac Pro’s network adapter connected to our LAN on port 1. This removes the need for a second set of NAT rules between the host Mac and guest OS.
Make sure that the MAC address of the VM matches the static DHCP reservation in the router allowing port forwarding rules to function.
4. Install Ubuntu Server
We installed a vanilla setup of Ubuntu Server 16.04.4 LTS without any additional services. On a Mac it’s best to do a manual setup of the keyboard because auto detection can fail and make using the server hard work!
Once you’ve logged in to the server run a few commands to verify that we have required software in place:
sudo apt-get update && sudo apt-get upgrade (ensures that all Ubuntu files are up to date)
sudo apt-get install default-jre (installs Java runtime environment required by the JIM)
sudo apt-get install usbmount (optional, but helpful to auto mount a USB drive if you’re using one)
5. JSS Login User
From within the setting of your Jamf Pro MDM (JSS) you need to setup a new user who has only the ‘Infrastructure Manager Instances’ privilege enabled. Record the user name and password as required in the JIM setup.
6. Install the Jamf Infrastructure Manager
And finally install the JIM. We used a FAT formatted USB drive to copy the installer file ‘jamf-im_1.3.1-0_all.deb’ on to our server. Thanks to the usb mount software we were then able to start installation with this command
sudo dpkg --install /media/usb1/jamf-im_1.3.1-0_all.deb
The exact path to your USB drive may not be /media/usb1. To verify the path to your drive use the command:
sudo df -h
Once the installation starts you will be asked for four items of configuration only:
- JSS URL - typically https://myorg.jamfcloud.com/
- The FQDN of your JIM - jim.myorg.com
- The username of your new JSS user
- The password of your JSS user
7. Check Connectivity
Once the server has been installed you can verify forwarding rules and confirm it’s listening on the correct port by typing this command:
nc -z jim.myorg.com 8389
Run this command from your LAN and crucially also from a Mac outside of your network. Once the server is installed you should receive a ‘succeeded!’ message from inside and outside of your network.
8. Setup in JSS
In your Jamf Pro MDM setting you should now see a successfully integrated infrastructure manager instance in Settings > Server Infrastructure.
Go to Settings > System Settings > LDAP Servers to enable the LDAP proxy for you LDAP server. The URL of your LDAP proxy will be available from a drop down menu of register JIM instances, but don’t forget to add the port number 8389.
9. Troubleshooting
If things aren’t working check the log files below. Typically issues are caused by internal and external DNS records not being in place before the JIM was setup, so you will see errors around the socket listening for inbound traffic on port 8389:
- /var/log/jamf-im-launcher.log
- /var/log/jamf-im.log
Follow us on Twitter.
Email us at info@krcs.co.uk
Call us on 0115 9851797
No Comments yet. be the first to comment.