
Beginning with Anchor-Buoy
Chloe, one of our FIlemaker developers, writes about her experience with the Anchor Buoy ruling, and how it helps her with visualising the relationships in her projects.
I stumbled into FileMaker development a few years back, while trying to develop a custom app for a start-up. I started by modifying the excellent starter solution from RCC Consulting, FM Starting Point. The first data relationship graph I saw, even before knowing anything about how a relational database works, was this:

Part of FM Starting Point Database Relationship Graph
I am really thankful for that, because it has made my life much, much easier. I could have easily started from a simpler file and expanded its graph, which would probably have looked like this after a few months:
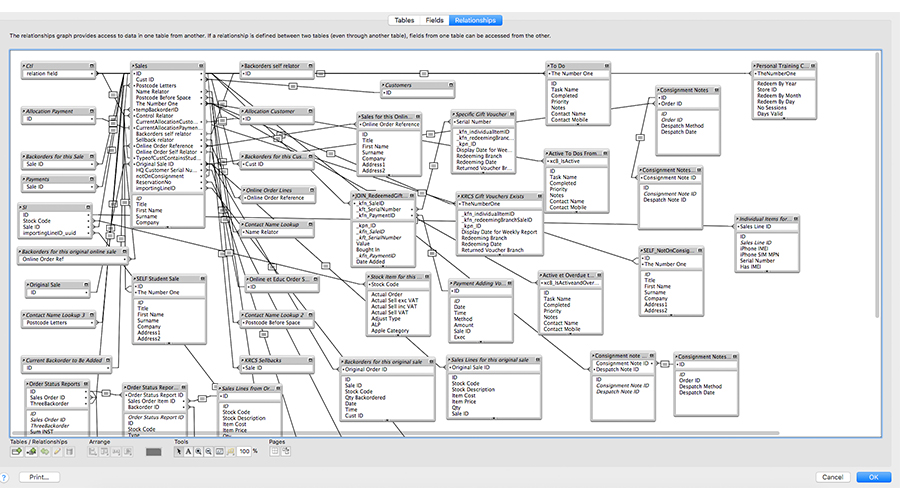
A spaghetti-type relationship graph that grew and grew … during years in development. Not the best, but not the worst I’ve come across!
See the difference? The former relationship graph is using the Anchor-Buoy framework. It is easy to navigate and, at a glance, see what is related to what. This is invaluable for a beginner, and I’ll explain why below. But first, let me explain how data is structured in FileMaker.
Table, Table Occurrence and context
FileMaker is both a relational database management system and a rapid application development tool, meaning that it enables us to quickly build applications based on data. Now if you need an invoicing app, you want to store at the very least, data about your customers, what they bought (products or services) from you and data about the invoice you sent them (invoice number, date, etc.).
The base elements we use in FileMaker to do this are Tables, Fields and Relationships.
- A Table stores data about an entity, for example customer data.
- A Table is composed of Fields, in which data about an aspect of the entity is stored. For example, in the Table holding customer data, a possible Field could be “First Name” or “Email”. In a spreadsheet-equivalent a Table corresponds to a worksheet, the Fields are the columns.
- A Relationship connects 2 Tables, allowing them to reference data from each other.
What the relationship graphs in both pictures above show are Table Occurrences (TO). These are representations of an underlying table, on which Layouts are based. Layouts are what the user sees and interacts with. The pictures above also show Relationships. For a close up, let’s look at the picture below.
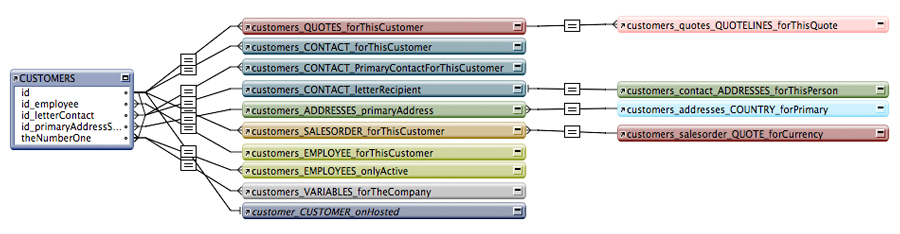
Zoom on the Customers relationships in one of KRCS file
The CUSTOMERS TO is linked to the Quotes Table via the customers_QUOTES_forThisCustomer TO. This means that quote information related to the customer will be available on a layout based on CUSTOMERS.
This is Context: on which TO is my layout based? Which related TO can I access from there? Knowing this is crucial to ensure scripts and data entry take place in the right table.
Now imagine working on the app from Picture 2. You are on a Layout based on the Sales TO (roughly at the top left). From there, if you follow the relationship lines, you’ve got access to pretty much all TOs from the graph, through various relationships, that will filter what data you can see from their underlying Table. So at a glance, it’s not clear what you can or can’t access! Especially because FileMaker relationships are bi-directional: they work wherever the TO is placed on the graph in relation to any other TO. As a beginner this can easily be a source of confusion, that’s why I think it is really important to start learning with Anchor-Buoy. But what is Anchor-Buoy exactly?
The rules of Anchor-Buoy
Anchor-Buoy is a framework, i.e. a set of rules to apply how you set up your database relationship graph in FileMaker. The rules are as follow:
- Each Table gets its own Table Occurrence Group. A Table Occurrence Group is shown in Picture 3 above. It always starts on the left with a TO representing the base Table = the Anchor, and on the right, all related Tables = the Buoys.
- All layouts are based on the Anchor TO.
- All Calculations are based on the Anchor TO.
- A descriptor is added to the description of the Buoy TO to describe the relationship. Buoys TO are named as the path from the anchor, separated by underscores, with the base table usually in capital letters.
- Optional: colour coding can be added to highlight all TO from the same base Table.
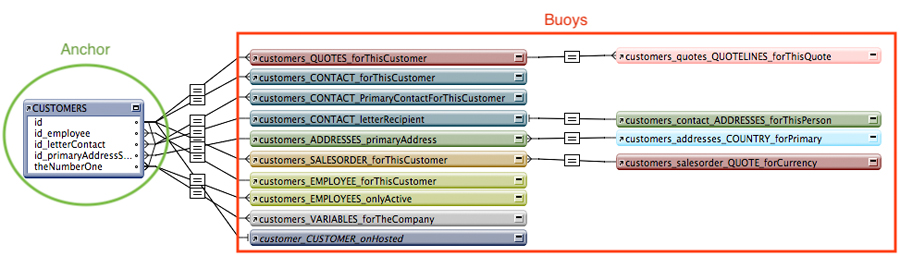
Example of well-formed Anchor-Buoy Table Group Occurrence
It looks tidy – what else?
The key to clarity of Anchor-Buoy is rule ii. Because all layouts are based on an Anchor, you are constantly working with data along the relationship, downstream, from left to right. No bi-directionality issues! Additionally, FileMaker will help you see the context when you are editing that layout. When editing a field on a layout, the Define fields dialog will look like this:
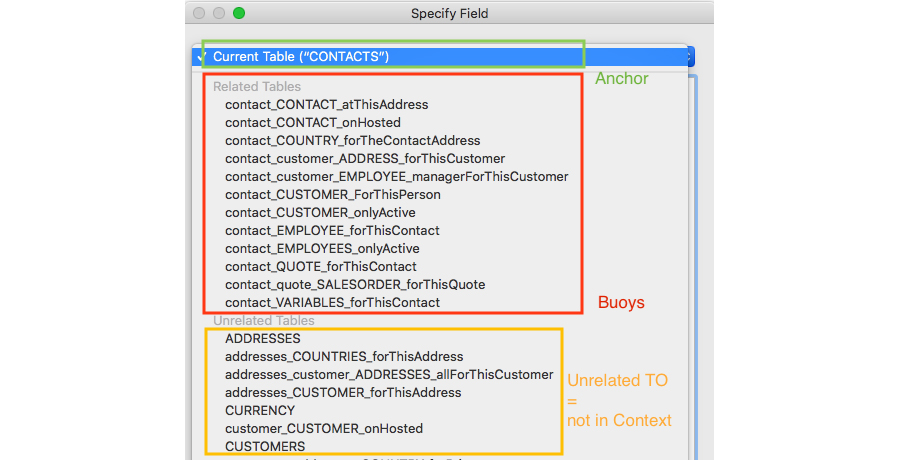
Specify Field dialog on a layout based on CONTACTS TO
It makes it much more straightforward, to select the right field in the right table, and to use the Go to Related Record script step. For example, you are on the Contacts layout and you want to access the related Customer. You can use Go To Related Record, and select which table to use for the relationship. Thanks to the naming convention of Anchor Buoy, you will quickly see in the table list, which Buoys are related to the Contact Table. Furthermore, if you pick an unrelated Table, you will get an error. With the Spaghetti model, all tables are related to each other in some way, so you need to be careful in picking the right TO because you won’t necessary get an error back, but the Go To Related Record script step could bring unexpected results.
Anchor-Buoy and beyond
I would strongly advise any beginner in FileMaker to follow the Anchor-Buoy rule. It makes life so much easier as you don’t have to constantly think about context. Context is embedded on your layout in that framework. However, as reported by Kevin Frank in his article Life After Anchor-Buoy, for massive apps with a lot of TOs, the redundancy inherent to Anchor-Buoy might negatively impact performance, as large portions of the graph may need to be repeated many times. Many other frameworks exist to organise a FileMaker relationship graph. The most important thing is to be consistent and clear for any future developer that might stumble across the file. As a company with several developers we believe that the benefits of Anchor-Buoys in term of clarity and ease of use outweigh the redundancy drawbacks, so that’s what we use (mostly) and advise to use. If you have a FileMaker solution with any kind of graph – even the worst spaghetti-type one – we’d be happy to discuss it with you, and we’d even streamline it for you.
Follow us on Twitter
Email us at info@krcs.co.uk
Call us on 0115 9851797
No Comments yet. be the first to comment.